Until a few years ago I didn’t even know there was such a thing as an engagement photo shoot, and if I did come across mentions of them it seemed to be more of an American thing.
My little brother got married recently to his Canadian bride and this was something that their wedding photographer threw in as an extra. The photos were taken on a friend’s farm and were really lovely. I figured that my fiance and I could do the same thing, but I didn’t want to spend money on a photographer for the privilege.
I am lucky in that I studied photography as one of my A-Levels in college, so I know a bit about what makes a photo look good. I have a decent bridge camera (not too expensive, I think it cost me about £80 new), but I reckon you could do as good a job with any camera. I thought I would share my top 10 tips to help you create your own DIY engagement photos.
Top 10 tips
- Pick someone to take the photos for you – Luckily I had one of my brothers on hand who was more than happy to take our photos for us. I gave him a bit of direction on some photos and told him to ‘snap away’ on the others. The staged photos are nice, but my favourites of ours are the spontaneous ones with us laughing and generally mucking about like the two eejits we are!
- Pick a nice (quiet) venue – Some places (such as one of the houses and gardens that I used to work in) have now jumped on the engagement photo bandwagon and started charging for you to come in and take your photos. We picked a public walled garden instead which has special meaning to us. We went on a weekday, mid-afternoon so it was very quiet and we got peace to do our thing.
- Pick a day with decent weather – Not too sunny, not too cloudy, otherwise you may end up with photos that turn out too bright or dark. This is especially true if you’re taking photos with the sky in the background.
- Take a backup battery – Like me, you’ll probably spend a lot of time ‘fixing yourself’ before you manage to take your first photo. Take a backup battery just in case!
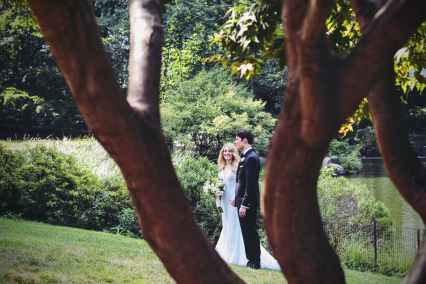
- Use the “Rule of Thirds” – This is one of my favourite things that I learned as a photography student. When we take photos, we tend to just place people/objects slap bang in the middle. While that can work sometimes, it can be much more visually interesting to place the subject a little off centre. Here’s an example…

Imagine the rectangle viewer on your camera, now imagine you divide the rectangle into 9 equal squares. Placing the subject of your photo into one of these thirds changes the way the photo can look entirely:

- Want that dreamy blurred background? – Tell your photographer to go away! Be nice about it though, it’s what photographer’s call ‘depth of field’ and it can be really useful. One easy way of achieving this look is by shooting the subject of the photo from far away and zooming in (at the same time also making sure there is a good bit of distance between the couple and the backdrop).

- Frame your photo – You can do this easily by making sure you have something interesting in the foreground of your photo, it doesn’t have to be much (a branch with a few leaves/flowers on it perhaps?) and it shouldn’t take away from the main subject of your photograph. Getting very close to the foreground object while focusing on the happy couple will give you the dreamy effect of tip #6, but in the foreground instead of the background.
- Play around with colour and black & white! – Black and white photography is one of my favourites, and if you do pick a super sunny day the brightness of the sky can make for wonderful contrast in your photos. You can take all colour photos on your camera, and then play around with them in the photo editing software of your choice to see what you like best.

- Order your prints online – Getting photos printed in a dedicated shop or even using a printing machine in one of the supermarkets can be really expensive. I opted to print mine using the online company, Snapfish. They do a really good job and you can choose to print your photos in different sizes, matt/gloss etc. We had a code for a free (exc. postage) photobook from back when McDonalds were doing their Monopoly prize promotion so we got the photo prints as well as the photobook quite cheaply. There’s nearly always a promo code floating about for Snapfish so it’s worth doing a search online before you purchase. I can also recommend TruPrint who do some brilliant offers!
- Have fun! – That’s what it’s all about at the end of the day! Having a great time ensures your smiles for the camera will look more natural and by the time you’re finished you’ll have fantastic photos to remember the day by.
Wishing you good luck and lots of laughs! If you take any photos you’re especially proud of I’d love it if you’d like to share them in the comments.
All the best!
Lyndsey

Some great tips! I didn’t know about ‘the rule of thirds’ am definitely going to try that out soon 🙂
LikeLike
Glad you enjoyed reading my tips, the rule of thirds is a great trick to use in any type of photography – good luck!
LikeLike
What a fab idea, beautiful photos. I’m not a photographer and only take photos using my mobile but I think you give some great tips for those who want to make money from photos.
LikeLike
Thanks Suzanne, I can’t take credit for the photos unfortunately, they’re a Google search job 🙂 You can absolutely use these tips for making money from photographs too, it’s something I may look into myself in the future!
LikeLike